Agriculture
Agriculture
  • A propos de nous
  • Trimble.com
    • English
    • English(UK)
    • Français
    • Deutsch
    • Español
    • Italiano
    • Русский
    • Українська
    • Español, Argentina
    • Español, Mexico
    • Türkisch
    • Português
  • Facebook
  • LinkedIn
  • Twitter
  • YouTube
  • Instagram
Agriculture
  • Produits
  • Solutions
    • Préparation du terrain
    • Guidage
    • Services de correction
    • Plantation et semis
    • Contrôle du débit et de l’application
    • Gestion de l’eau
    • Gestion des données
    • Récolte
    • Trimble Select
  • Formation et assistance
  • Ferme Virtuelle
  • Comment acheter
  • Connexion
  1. How-to Central
  2. Managing Farms

Managing Farms

Keep track of farms across your account, without a fixed crop year, to associate with fields on Trimble Ag Software. Use quick-add features to add new farms to your list, or create new farms from your mobile app.

Farm asset options

View and manage farm assets online to see what’s growing where and who you’re selling to, with summary and detail views.

Farm Assets | Trimble Ag Software

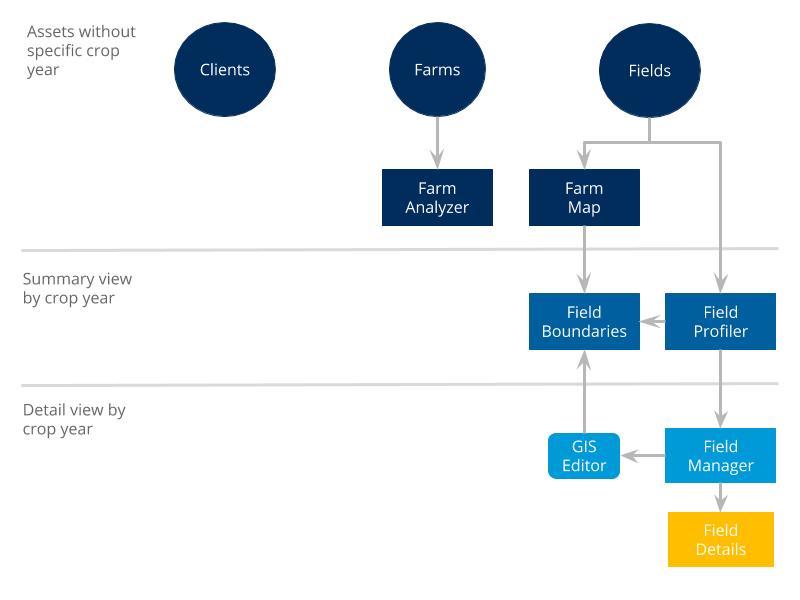
Once farm assets are set up online in your Trimble Ag Software account, including clients, farms and fields, you can view and make certain changes to these records on the mobile app.

Farm Assets Options | Trimble Ag Online and Trimble Ag Mobile


Add or edit farms online

Farms can be set up online with basic information, and can be associated with fields on your account during setup online or on the Trimble Ag Mobile app. Include a client (also known as grower on precision ag vehicle displays) to easily group fields and farms on your account.

  1. Log in to your account online (learn more)
  2. Click on the Farm tab (top menu)
  3. Select Farms from the left navigation menu
  4. Click on the Farms tab
  5. Click Add Farm (or click the edit icon  next to the farm name)
  6. In the pop-up window, enter or edit the Farm Name (required)
  7. Enter or edit the optional FSA Number (Farm Service Agency tracking number assigned to farms in the US by the USDA)
  8. Select the Client name from the dropdown list or click the quick-add plus + sign to add a new client name
    • Note: adding a client name to each farm makes it easy to match both as a paired set to fields in your account; client names are not related to contracts that track projected sales revenue for your farm
  9. Click Save (or Cancel)


Add farms on the mobile app

Quickly add new farms to your Trimble Ag Software account when editing or adding fields on your mobile app. To include an optional client name, edit the field details online.

  1. Log in to the mobile app with the same Trimble ID used to access your online account (learn more)
  2. From the mobile app home screen, select the preferred crop year (top left)
  3. From the mobile app home screen, click on the Fields tile
  4. Tap the + icon on the top right corner of the screen to add a new field, or select an existing field by searching by field name, or by expanding the list of farms (tap the dropdown arrow in the top, black row) to display and select a field
  5. On the New Field screen, tap Farm

  6. Click Create Farm

  7. Enter the Farm Name (required)
  8. Enter the optional FSA Number (Farm Service Agency tracking number assigned to farms in the US by the USDA)
  9. Click Done (or Dismiss) to return to the list of farms, which now includes your new farm
  10. Sync changes with the online account when you’re within cellular or wi-fi range, by returning to the home screen and tapping the green sync icon  (top right)

Later, log in to your online account to associate a client with your new farm, if needed.

Retire farm assets online

When you’re starting to set up your Trimble Ag Software account, you can easily retire clients, farms or fields from your online account, with the option to unretire partial details for these items later. Do this in the early stages of setting up your account as, once items are retired, some important information such as operational data and expenses may not be available if the asset is unretired later.

  1. Log in to your account online (learn more)
  2. Click on the Farm tab (top menu)
  3. Select Farms from the left navigation menu
  4. Select any tab for Clients, Farms or Fields
  5. (Optional) Click the pencil  icon to edit the name of the asset to identify it later as the retired item when viewing on the mobile app; click Save
  6. Click the checkboxes to select one or more items on the list
  7. Click the delete (retire)  icon
  8. Review the warning and click Retire (or Cancel)
  9. To view retired (deleted) items, check the option on the top right corner to Show Retired, then select one or more items with an asterisk* and click  Unretire

  10. Review the warning and click Un-retire (or Cancel)

Note: Fields deleted with the Manage button on Field Manager Overview may still be visible in the list of fields under the Farm menu, where they can be retired from view.


Assign fields to farms with Field Profiler

In addition to managing field boundaries, use the Field Profiler™ to assign fields to farms on your Trimble Ag Software Account. Save time by organizing farm resources with the click of a button.


  1. Log in to your account online (learn more)
  2. Select the preferred crop year (top left)
  3. Click on the Field tab (top menu)
  4. Select Field Profiler from the left navigation menu
  5. View the list of fields for the specified crop year, with options to search, filter or print the views selected
  6. Click the checkboxes in the first column to select a field or group of fields, or Select All
  7. Click Manage

  8. Select Assign Fields to Farms
  9. Click the dropdown list to select a farm from your account (or select Blank):
  10. Click Assign (or Cancel)

Related: you can also assign fields to farms on your account and more, in Field Details

Using Farm Analyzer

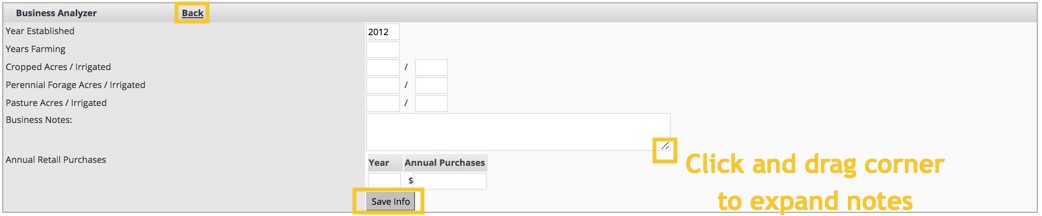
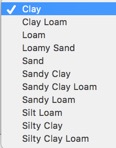
Use the Farm Analyzer™ template on your Trimble Ag Software account to create an evolving snapshot of your farm’s business and history, including property, soil and crop management practices. Update details online to print and share with advisors or agronomists. Print the summary each year to keep a historical record for previous years.


  1. Log in to your account online (learn more)
  2. Select the preferred crop year (top left) to appear on report header
  3. Click on the Farm tab (top menu)
  4. Select Farm Analyzer from the left navigation menu
  5. Click Update to edit a section with the latest Business, Farm or Fertilizer details (overwrites information saved for previous crop years)
  6. Enter Business details, click Save Info (or Back to return to previous screen without saving changes)
  7. Enter Farm details, selecting from the dropdown lists for Soil Type and Soil Group, then click Save Info (or Back)

    Soil Type options:

    Soil Group options:
  8. Enter Fertilizer Program details, then click Save Info (or Back)
  9. Click the Print link (top right corner of screen) to see a preview of the report for that crop year
    • Press CTRL+P to select a printer and print hard copies, or print to PDF to save in your files or send as an attachment via email

Search How-To Central:

How-To Central Categories

Was this helpful?

Trimble Agriculture
  • Préparation du terrain
  • Plantation et semis
  • Gestion de l’eau
  • Récolte
  • Guidage de Tracteur
  • Compatibilité ISOBUS
  • Tenue de document
  • Suivi du rendement
  • Gestion de la comptabilité
  • Positionnement avancé
  • Modelage Terrain
  • Gestion des données
  • Trimble Select
  • Trimble AG
  • Support
  • Comment acheter le produit
  • Politique de confidentialité
  • Ne pas vendre mes données personnelles
  • Réponses Trimble – Covid-19
  • Facebook
  • LinkedIn
  • Twitter
  • YouTube
  • Instagram
© 2025 PTx Trimble LLC| Privacy Policy